Showing posts with label Photography. Show all posts

Sunday, March 29, 2015

Desert Rainbows

Rainbows always fascinate me.  They are beautiful, ephemeral, and not something I see every day.  When I am lucky enough to see a rainbow,  I try to take time to enjoy it and appreciate it.  As a Christian, a rainbow always reminds me of God's promise to Noah that He would never destroy the earth by flood again. 

The science of rainbows are that it takes rain and sun to create a rainbow.  In the desert, rain events are few and far between, so a rainbow is even more special in the desert.  

In my last trip, I was at Big Bend during several rain events.  During the first one, the rain was in the middle of the afternoon when the sun was still high in the sky.  The location of a rainbow is related to the sun angle.  I was at the bottom of the valley when I saw the rain and sunshine.  I knew that I had to get up higher in order to see the rainbow.  I was with a photographer friend. When we got to the top and started looking for the rainbow, she saw it first. But it was against the hillside not high in the sky due to the sun angle - much as I had expected. I knew we would be looking down on the rainbow because of how high in the sky the sun was. I rushed to photograph it and thought that I had missed it.  

When I began working the photos from the trip, I realized that I had actually captured a double rainbow.  One is barely visible against the hillside and the other in the sky. 


As we drove back to where the bluebonnets were,  I saw another rainbow barely peaking over the canyon wall.


On a different day, the sun and rain again appeared together. This time the sun was lower in the sky and I knew we needed to get down lower to see it.  Sure enough, a rainbow next to Casa Grande.


As a photographer, I get a sense of urgency when I know a rainbow is possible. I can hardly wait to get the chance to photograph it, so when I see one is possible and I'm in the wrong place, you can imagine me bouncing in my seat in anticipation and hope that I will get there in time to capture it. 

Rainbow photography tips:

1.  Learn the sun angle - so you know whether or not you need a taller vantage point or a lower vantage point to see the rainbow.

2. Use a circular polarizer filter.  It will brighten the rainbow or make it totally disappear depending upon how it is turned.

3.  Bracket your exposure so you have a better chance to get the most vibrant colors. 

4.  When possible, try to find a location near you with an optimal composition.

5.  Take time to enjoy the rainbow in the short time it is visible. 

Saturday, January 31, 2015

A Big Bend Panorama


There are air quality issues at Big Bend . . . many of the days I was there . . . the haze obscured the vistas.  I had assumed the air pollution was coming from Mexico, but research indicates that coal fired plants in both Texas and Mexico contribute. Prevailing summer winds bring pollutants from the Gulf Coast and Mexico into the Big Bend area.  

However, it also gave some opportunities for some dramatic photos.  I was fascinated by how the backlit mountains were silhouetted with the smog defining the ridges.  I took a sequence of shots, hoping that I would have something to work with. 

Here is the original.


Post processing is major part of a photographer's toolbox.  In this case I cropped in photoshop to remove most of the sky and some of the foreground to create a more panoramic look.  

Then I used NIK Software Color Efex Pro's Detail Extractor to bring out more of the details in those amazing volcanic features.  

Here is another view of the same scene, this time shot with a sequence of shots and stitched. While this one shows more the vast and beautiful panorama here, full sized it is 10 inches tall and 75 inches wide . . . somehow I don't think I will ever print it . . .


I wish that there was more being done to reduce the pollution . . . Big Bend is far from the populations centers of Texas . . . out of sight, out of mind . . . 


Tuesday, May 13, 2014

Photographing the Desert

I have grown to love the desert, but sometimes I find it difficult to photograph in ways that really capture the beauty that I see.  Parts of Big Bend Ranch State Park are dramatically beautiful because of the viewpoints overlooking eroded canyons where it feels like you can see forever.  Photographing to capture that wide expanse sometimes falls short because what your eye is appreciating can look small and insignificant in a photograph.

I used my 100-400mm lens at 190mm to zoom in to get a better view of the ridges and canyons in the distance.


Here is the wider angle shot with my 24-105mm lens at 45mm.  Now the foreground becomes more important and the canyons seem far, far away.  The challenge with the wide angle shot is to move around and find interesting things in the foreground to capture the interest of your viewer and lead them into the image.  In this shot so much of the foreground is typically desert "busy" but that one yucca works to anchor the image.  This gives your viewer something that grabs the eye and hopefully encourages them to continue exploring the image.


This next shot was also taken with the 24-105mm at 45mm, but I have changed location with the yucca a much more prominent feature in the image. I am closer to the yucca but the camera was also closer to the ground.  This gives more detail to the other plants on the desert floor and removes the cluttered look at the lower left hand side of the image above.

I moved around more because I wanted to see if I could get one of the ocotillos as a point of interest in the image.  I changed to 67mm on the lens. One of the things I don't like in this image is that yucca stalk that creeps into the image on the left. I kept moving around trying to find the perfect spot so it would not be in the image. Yes, I can clone it out, but I prefer to do as much as I can to get the best images in the camera.


Each of these images tells a slightly different story about this scene.  Which one do you like best?

Thursday, August 15, 2013

Perseid Meteor Shower 2013

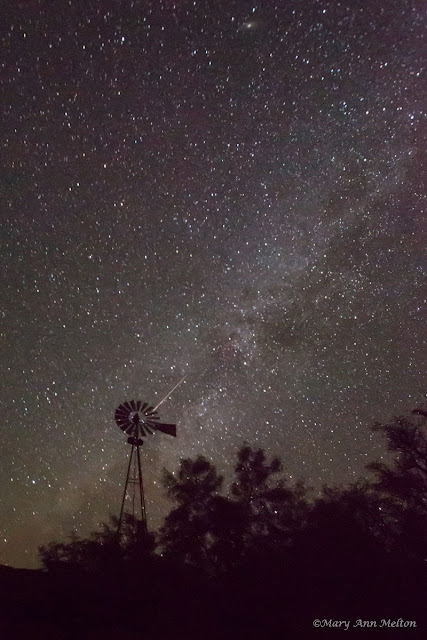
Photographing meteor showers means staying awake between midnight and dawn in a dark place far from city lights.  Mason, Texas was my choice this year and my photographer friend, Nancy Damrom joined me in this adventure.

Because this year's Perseid meteor shower peaked on Monday afternoon, we photographed both early Monday morning and early Tuesday morning.

Our location was the Lindsay Ranch which has hunting cabins for rent with access to their 700 acre ranch.

The first night we set up near the windmill.


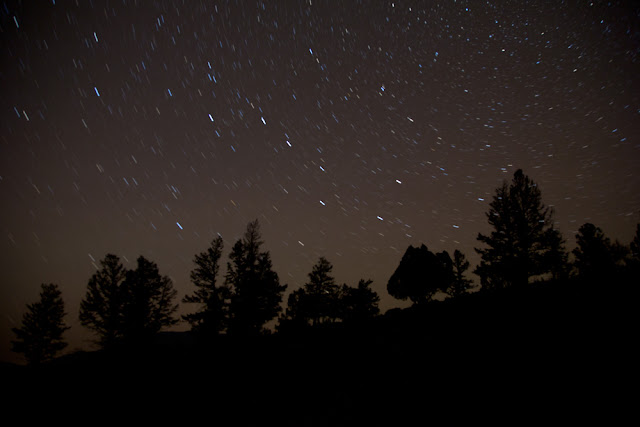
The second night we wanted to have trees in our composition.


In our night driving and while we sat waiting for meteors we saw ringtail, skunks, armadillos, deer, and burros.  The night was filled with sounds of crickets and tree frogs.

It was well worth shifting the sleep schedule for a couple of days to spend time watching the beautiful Milky Way waiting for meteors to streak across the sky.  God's creation is a wonder to behold!

Friday, July 05, 2013

Fireworks - Old Settler's Park - Round Rock, Texas 2013

We got to the park early with a picnic dinner from Golden Chick. The park was crowded and most parking areas were full. By the time we got settled, I feared I was too far away from where I had seen the setup to get what I wanted. But it was fun to watch other families get settled in with their chairs, blankets, and toys for the kids. I especially enjoyed the toddlers, imagining my grandson, Tobyn, exploring his world next year.


4 sec, f/16, ISO 100    

Doing one's homework in advance is usually a good thing, but since I had been to the Old Settler's Park fireworks before, I didn't look it up.  But as it got later I checked Round Rock's website. The fireworks weren't scheduled to begin until 10:00 p.m.  They were going to synchronize with the Dell Diamond fireworks after the ball game.  

When they started, I was ecstatic, because I had a wonderful position.  When zoomed out with my 28-105 lens the bursts overflowed my frame. 


4 sec, f/16, ISO 100


I had to zoom out to get the full displays.  


3.2 Sec, f/22, ISO 100


My experiments with focus blur did not do as well.  My usual technique for photographing fireworks is to use a distant light as my focus with autofocus. Then I change it to manual focus so that I don't have to wait for the camera to refocus on moving fireworks for each shot.  Trying to do the focus blurs from  I mentioned yesterday from PopPhoto.com  required leaving the camera on autofocus and then trying to change the focus mid shot when I was only shooting 4 second shots.  I ended up with camera motion which while intriguing did not produce the look I was trying for.

Here are a couple of the shots where I was trying for focus blur. 

3.2 sec, f/22, ISO 100


3.2 Sec, f/22, ISO 100

I tried setting a longer shutter speed for one shot.  I probably should have tried more choices in longer shutter speeds.


13 sec, f/22, ISO 100

But the fireworks were happening too fast.  I didn't want to miss the captures I knew how to do since I had such a good photographic angle this year. So I went back to my standard methodology - fixed focus with manual settings for exposure for consistency.


4 sec, F/16, ISO 100


4 sec, f/16, ISO 100

I did change my exposure by changing my f/stop giving me my best Grand Finale photos.


3.2 sec, f/22, ISO 100


3.2 sec, f/22, ISO 100


3.2 Sec, f/22, ISO 100

Fortunately, the Dell Diamond shoots fireworks after every game.  I should go back and try again for the focus blurs.

Thursday, July 04, 2013

Photographing Fireworks


As a photographer, I think about photographing fireworks each year.  In going back through slides that we took 30-40 years ago I found fireworks photos.

The first year I took digital firework shots, I researched on the internet and got some ideas. The nice thing about digital is that you can shoot a test shot early in the evening to make sure you aren't over exposing.  You can make adjustments that will last until the time for the Grand Finale.  

From 2004, here are some of my firework images along with their settings.


2 sec, f/16, ISO 100, Canon 10D


2 sec, f/16, ISO 100, Canon 10D

In 2010, we were in Breckenridge and I tried to get shots that showed the fireworks over the sweet town.  


3.2 sec f/13, ISO 400, Canon 5D

I had tried the same thing back in 2005 when I was visiting Debra in Malibu, California.  The fireworks were launched from barges in the ocean.  This one captures the ocean, beach and an observer.


From professional Kathy Adams Clark's blog is another new way to photograph fireworks.  Since I happen to love motion blurs, I am going to try this tonight.  Have the focus sharp at the beginning of the burst and then change the focus during the exposure.  Click here to see some examples.  The article with more information is at PopPhoto.com, Make Unique Fireworks Photos Using Focus Blur.  


When the end is near, that great crescendo of fireworks is a challenge. It is very important to reduce your exposure significantly when it starts.  In the excitement of the moment, I've never gotten it quite right. The finale happens so quickly so you don't have much time to make adjustments as you shoot.


Don't forget to enjoy the fireworks themselves.  Step away from the camera every now and then to appreciate the beautiful show.

I'm finishing this blog with photos from other years and other cameras.  

I wish for you a Happy Fourth of July!  


1 sec, f/13, ISO 400, Canon 5D


4 sec, f/16, ISO 100, Canon 5D


2 sec, f/13ISO 200 Canon 5D MKII

Saturday, March 16, 2013

Comet Pan-Starrs


Night before last we sat out on our front porch and found the comet Pan-Starrs with our binoculars.  We've been comet watching before but this was by far the easiest to spot of any we've seen.  By the time the sky is almost dark, it is still high enough to be visible.  Each night it is farther from the moon, but it is at about the 5:00 position about 30 degrees above the horizon.  

Tonight I wanted a cleaner view of the sky - so we went to Chandler Road just west of Toll 130.  This happens to be one of my favorite places to photograph lightning.  The city lights are far enough away that they are not too distracting.  There is also a nice paved area that is out of the way of traffic.

I've cropped these photos - and used Adobe Camera Raw to brighten the exposure and darken the sky.  

 I photographed these with my Canon 5D MK III and my Sigma 300-800mm lens at 800mm.

Sometimes you know that  you're not going to get award winning photos. For this one, I had to focus on one of the light towers in the distance and then set to manual focus to keep the focus.  The wind was gusting which makes a bigger difference with a big lens even on a sturdy tripod.  And . . . I couldn't see the comet through the view finder - which meant I was guessing each photo and then repositioning to try again.


The comet was eventually obscured by a small clump of trees.  But even if these are not award winning photos - they are nice memory photos - and another small adventure for Henry and me.

Monday, October 01, 2012

Yellowstone's Pronghorn


I freely admit it - I call them antelope because I grew up with the song "Home on the Range."  But true antelopes are found in Africa.  The American antelope is really the pronghorn, Antilocapra americana. It is so truly unique it is the only member of the family Antelocapridae.  Their horns are unique.  Deer and elk have branched antlers that are shed each year.  Goats and cattle have hollow horns made from hair that are not shed.  Pronghorn have are the only animal with branched, hollow, hairlike horns that are shed annually.  Both males and females have horns, but male horns are larger and have a distinct prong.  Males also have a distinctive black marking on their face below the eye.


Running up to 60 miles per hour, it is the second fastest mammal in the world. It can sustain 30 miles per hour for miles. Only the cheetah is faster and the cheetah cannot sustain its speed as long as the pronghorn.

Pronghorns prosper in dry environments.  Pronghorn are found on the Great Plains from Texas north to North Dakota and in the high desert sage found in New Mexico, Arizona, Nevada, Utah, Colorado, Wyoming and Montana.  They eat forbs (non woody flowering plants) and sagebrush with grass making up only a very small portion of their diet.  In Yellowstone, they are frequently seen in the sagebrush in the Lamar Valley.

On our travels we have seen them regularly in northern New Mexico along highway 84/87 east of Raton, New Mexico and along I-25 in Northern New Mexico and southern Colorado. We've also seen them in other sage brush areas of Colorado.   They are common in the Texas Panhandle. I've seen them regularly near Vega and Borger.  They can also been seen in Texas near Alpine and Marfa.

Unlike deer, pronghorn do not jump fences. With the older style barbed wire fences, pronghorn literally run through them or go under the last wire.  Woven wire fencing is a true obstacle.
Pronghorn can raise the hair on their white rumps as a signal of danger.  This is a signal to the herd that danger is near.


The rut for pronghorn occurs in late summer and early fall.  Fawns are born in the spring, usually in pairs. They can walk within an hour of birth and by the fourth day can outrun a man. Pronghorn fawns are odorless as protection from predators such as coyotes and golden eagles. 

While not all pronghorn migrate, Wyoming pronghorns travel 150 miles between Wyoming's Upper Green River Basin and Grand Teton National Park.  They move away from areas with deep winter snow.  The only land mammal that migrates farther distances in North America is the caribou.  

These photographs came from Lamar Valley in Yellowstone.  We saw a small herd near the road. They were a mix of female and juveniles.   I saw the direction they were heading and chose to get ahead of them and park,  hoping they would stay near the road for some nice close up shots as they walked near the car.  I was most pleased when they did what I anticipated.

Saturday, September 22, 2012

Yellowstone's Night Skies

With clear, dry air  and very few electrical lights, the night sky in Yellowstone is glorious. We tended to explore the park until dark and then make our way back to Silver Gate driving at night. We stopped in Lamar Valley and I decided to try to photograph star trails and the the beautiful Milky Way. There are a lot of ways to approach night astrophotography. One approach is to shoot a long exposure and get beautiful star trails.


I learned quickly that if you are shooting the Milky Way, long exposures just leave the Milky Way blurry - not beautiful. My new Canon 5D MKIII has low noise even at higher ISO's. So I experimented with higher ISO and shorter shutterspeeds. This gave me beautiful Milky Way and much crisper stars.


I tried a different approach with this photo.  I shot away from the Milky Way and gave a much longer exposure trying to get the skyglow to illuminate the scene.  While  it does get the road - hand of man- I like this one.


The following night I went to a different place in Lamar Valley -Soda Butte.  I wanted to illuminate the Butte and get the stars.  My results were mixed because when I used the highest ISO, there is a LOT of noise. One shot was "messed up" by the passage of a car, but it looked better than I expected.

In this one below, the lights from a passing car lighted up Soda Butte.  Because I was trying to position the Milky Way in the third's position, I had to clone out our car and the reflective road poles.  I shot this with an ISO of 25,600 hoping to get the stars crisp. The noise level was much higher than I wanted so I definitely had to use noise reduction software.  There is still noise when you blow this up at pixel level. But it is pleasing anyway.


I did try light painting on Soda Butte, but was not happy with the results.

I meant to try one more time, but as the days went by getting up before dawn to look for wolves and staying out late to enjoy other parts of the park, our stamina gradually diminished. Our last night there was overcast.

Things I would try next time - lower ISO on the star trails over the trees. I used infinity focus for most shots, but I think it might have been better to focus on a brighter star. Henry recommended using a smaller aperture to try to get the stars crisper.

Perhaps I'll have another opportunity as we travel east from Seattle to try more star shots.

Sunday, August 19, 2012

Black Terns

 Photographing birds in flight is a challenge.  They fly by fast, it is hard to get the camera and lens to focus on your fast moving target, it is tricky to get a fast enough shutterspeed to stop the motion.  But it IS a fun challenge.

During my last two visits to Brazoria National Wildlife Refuge, I was seeing terns and gulls flying near me.  I have not studied terns enough to immediately identify them as they fly swiftly past me.  So, I wanted to photograph them to help me study their markings in order to identify what I was seeing. When you have a photograph, you can connect with other birders to confirm your guess.  But, getting that photograph . . .

My birding lens is a Sigma 300-800mm lens that I purchased before the price got so high. I also bought a strong tripod and a Wimberly Gimbal Tripod Head to be able to support the big lens and to get the most benefit from it.


The Wimberly head allows me to track birds as they go up and down in flight as well as to pan as they fly by. Sometimes I feel like Luke Skywalker on the Millenium Falcon as I try to pan with the bird's flight, get the focus on the bird and attempt the shot. I use AI focus which helps keep the focus on the bird in flight. But there are elements of both skill and luck in getting the focus on the bird and the shot taken before the camera focuses on something else. There are a lot of images that are destined for the trash folder, but with practice you can get images certainly good enough to make the identification. Sometimes you even get some good behavioral images as well.

These are black terns in their non breeding plumage.


Note the gray wings and the black smudgy spot right above the breast (under the wing) as well as the dark spot right behind the eye. 

In trying to capture the images, I was just shooting away.  But it was luck that I caught this shot in this pose.
You don't have a lot of time to frame your photo when you are shooting just to capture the bird in flight, so it is fun when you get the reflection as part of the image as well.

When I shoot birds, I generally shoot shutter priority.  In this case I started at 1/400, but decided that wasn't doing a good enough stop motion.  I bumped it up to 1/640 for these shots. I then set my ISO for the lighting conditions to get a good exposure at the optimum shutter speed.  With the muted early morning sun, it was ISO 500 for these shots.

Tuesday, August 07, 2012

Checklist for a Photography Trip

I've learned that I'd better check what equipment I'm packing and then check it twice before I leave on a trip. I've had too many trips where I got off in a hurry, grabbed my stuff, and then got on location and didn't have something I like to use.  I always get by with the equipment I have, but sometimes I miss something that got left behind.

I also have a house check list as well . . . so here goes:

Photography & Wildlife Watching equipment


All lenses with their circular polarizing filters, ND grad filters, etc
Everything in the big camera bag that belongs there
          (Sensor cleaning equipment, bulb blower, extra lens caps,  etc)
Hot shoe levels
Shutter release cable
All purpose tripod
Plenty of camera cards - preferably formatted and ready to go
Camera Batteries
Camera Card Reader
Portable hard drives - 2 so that I can have immediate backups before formatting cards
Cables for hard drives
Computer with charging cable
Big lens
Big lens tripod
New tote to roll big lens and tripod when on location and the distance to haul heavy stuff
       is too far for comfortable hauling

Extra quick release plates (all cameras, bigger lenses, and scope should have their own
      release plate in my opinion.)
Small window mount for photographing lightning from the safety of the car
Lens cleaning cloths

Miscellaneous items to pack


Cell phone with alarm for early morning wakeup calls
Binoculars for spotting birds and wildlife
Scope for close views of birds and wildlife
Bird books, wildflower books, etc
Portable chair
Sunscreen
Mosquito repellant
Hand sanitizer
Kleenez
Water bottles
Ice Chest


Leaving home


Air conditioner set at reasonable level
Dishes washed
Doors locked
Alarms set
Plants watered - watering arrangements made
Horse fed - and feeding arrangements made
House watching and house sitting arranged

Now that these are all taken care of . . . we're off on a short trip - birdwatching first - science fiction convention and probably more birding for me.

I'm hoping to photograph purple gallinules tomorrow!

Friday, June 22, 2012

Atwater Prairie Chicken National Wildlife Refuge

I've visited Atwater Prairie Chicken National Wildlife Refuge three times now at different seasons.  While I've not yet seen the prairie chickens, it is always a good experience.  The best way to see the prairie chickens is to go during the Annual Prairie-Chicken Festival the 2nd weekend in April.

The main entrance is on the south side of the refuge, but we went down Prairie Chicken Lane for fun.  There were so many cottontails and a few jackrabbits that I thought perhaps it should be named Bunny Lane!

It had been a long time since I had seen Northern Bobwhites - so it was quite a treat to see them and to hear their cheery "Bob white!" call.


We have Crested Caracaras living near me in Hutto, but this was the closest I've gotten to photograph them in the wild. I was thrilled to get the chance to photograph one so close.


This black vulture also posed cooperatively for me.


It was truly a pleasure to drive through the restored prairie.  And I was pleased to find more dickcissels!

Saturday, June 02, 2012

Creating Dramatic Photos

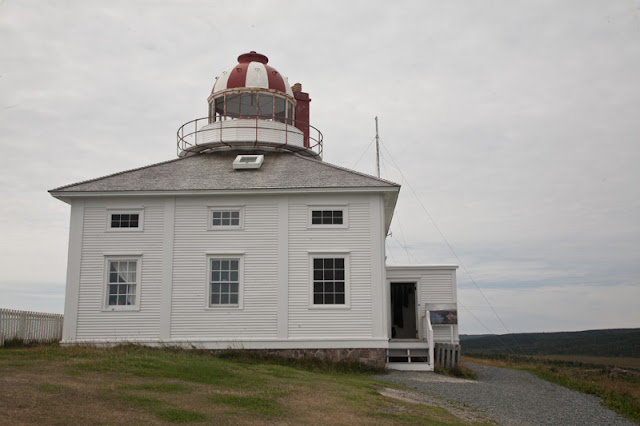
I was going back to my 2009 Canada trip and working up a new blog post when I came across this picture.  I wanted to use it as part of the blog, but the lighting conditions at the time I was there didn't create any really great photos.  So I started playing with the image.

Here is the original:


My first attempt was to add a Layer>Overlay with a neutral density gray choice to brighten the whites in the lighthouse and hopefully to bring out details in the cloudy sky.  The image remained bland.


So I thought about my choices to give this image "pop" and went to my NIK Software HDR Efex Pro. Now I wasn't combining images here, I just wanted to do something to make this one shot more interesting.  When I went to the filter, I had 33 presets to choose from.  After checking all of them, I chose "Realistic (Strong)" as the look I wanted.  


I also like Topaz products so I went back and used Topaz Adjust to see what look I could get. I used the HDR Collection>Dynamic Pop II. Then I went over to Local Adjustments and used a brush to darken the sky more and to brighten up the lighthouse.


When I'm at a location, I strive to photograph photos that will stand well on their own without excessive post processing.  Sometimes, the weather and the lighting are not optimum, so I'm glad to have these tools to create an interesting image when the conditions were not optimum on location.