Showing posts with label post processing. Show all posts

Saturday, January 31, 2015

A Big Bend Panorama


There are air quality issues at Big Bend . . . many of the days I was there . . . the haze obscured the vistas.  I had assumed the air pollution was coming from Mexico, but research indicates that coal fired plants in both Texas and Mexico contribute. Prevailing summer winds bring pollutants from the Gulf Coast and Mexico into the Big Bend area.  

However, it also gave some opportunities for some dramatic photos.  I was fascinated by how the backlit mountains were silhouetted with the smog defining the ridges.  I took a sequence of shots, hoping that I would have something to work with. 

Here is the original.


Post processing is major part of a photographer's toolbox.  In this case I cropped in photoshop to remove most of the sky and some of the foreground to create a more panoramic look.  

Then I used NIK Software Color Efex Pro's Detail Extractor to bring out more of the details in those amazing volcanic features.  

Here is another view of the same scene, this time shot with a sequence of shots and stitched. While this one shows more the vast and beautiful panorama here, full sized it is 10 inches tall and 75 inches wide . . . somehow I don't think I will ever print it . . .


I wish that there was more being done to reduce the pollution . . . Big Bend is far from the populations centers of Texas . . . out of sight, out of mind . . . 


Saturday, June 02, 2012

Creating Dramatic Photos

I was going back to my 2009 Canada trip and working up a new blog post when I came across this picture.  I wanted to use it as part of the blog, but the lighting conditions at the time I was there didn't create any really great photos.  So I started playing with the image.

Here is the original:


My first attempt was to add a Layer>Overlay with a neutral density gray choice to brighten the whites in the lighthouse and hopefully to bring out details in the cloudy sky.  The image remained bland.


So I thought about my choices to give this image "pop" and went to my NIK Software HDR Efex Pro. Now I wasn't combining images here, I just wanted to do something to make this one shot more interesting.  When I went to the filter, I had 33 presets to choose from.  After checking all of them, I chose "Realistic (Strong)" as the look I wanted.  


I also like Topaz products so I went back and used Topaz Adjust to see what look I could get. I used the HDR Collection>Dynamic Pop II. Then I went over to Local Adjustments and used a brush to darken the sky more and to brighten up the lighthouse.


When I'm at a location, I strive to photograph photos that will stand well on their own without excessive post processing.  Sometimes, the weather and the lighting are not optimum, so I'm glad to have these tools to create an interesting image when the conditions were not optimum on location.

Tuesday, January 29, 2008

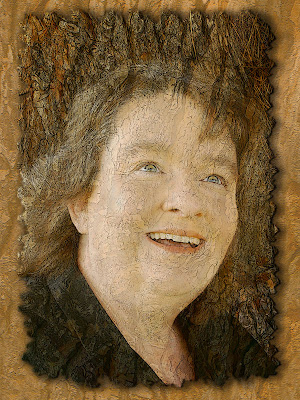
Photoshop CS3 - edges and three dimensions


Each photoshop workshop I attend leaves me with some new skills that often help me on a project that I'm currently working on. I had seen other people who managed to add interesting edges to their photographic work, but I was not real sure how they did it.

Obviously, to make this kind of presentation - a photo on a background, you're going to be working in layers. In this case there are basically four layers (in addition to the adjustment layers - levels, curves, etc.) The background is actually two layers, the tree bark faded into a lighter background. You can create this on the same document as the finished work. You copy and paste your bark and you create a layer of fill. I chose one of the layers to reduce the opacity (depending on the project, I try fading each layer to see which effect works best). This gives me a blend and in this case softened out the bark. Then using the shift key (on Mac) select both those layers and "merge layers." I then and did a levels adjustment to add a little contrast to this blend. I wanted some texture so I played with textures and decided that craquelure provided what I wanted. This background layer needed to be larger than the portrait layer, so I used a technique I had learned in December. You take the Clone tool and select an area (in this case I started at the top corner and worked down). After you have made your initial selection, you brush in to fill the area to match the existing texture or pattern. I had always made small corrective touches with the Clone tool. Knowing that you can brush in larger areas makes things so much easier and quicker.

I had already been working on the layers of my face blended into the tree. When I got my final version of that I took those two layers and merged to give me one layer. Now, here is the trick . . . I selected that level and using the option key created a black mask. The black mask makes the layer "disappear." Now I can chose an interesting brush tool and literally brush the layer back in. By choosing one of the irregularly shaped brush tools (with the color set to white) I can carefully work the brush to the edges of the portrait layer leaving a jagged, rough edge. If I make a mistake, all I have to do is set the brush to black, erase, and try again until I have a pattern I like. You can also play with the different shaped brush tools until you find the effect you like.

Now, at the end of the project I wanted to do some finishing touches and making that portrait layer more three dimensional was high on the list. First selected that layer and went to Layer Styles and added a drop shadow. I manipulated all the options until I had the effect I wanted (yes, lots of trial and error - play -it's fun to see how many ways you can add a shadow.) Then I went to bevel and emboss and played there until the bark seemed to stand up off the background.