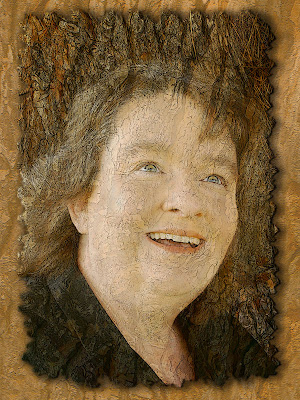
Each photoshop workshop I attend leaves me with some new skills that often help me on a project that I'm currently working on. I had seen other people who managed to add interesting edges to their photographic work, but I was not real sure how they did it.
Obviously, to make this kind of presentation - a photo on a background, you're going to be working in layers. In this case there are basically four layers (in addition to the adjustment layers - levels, curves, etc.) The background is actually two layers, the tree bark faded into a lighter background. You can create this on the same document as the finished work. You copy and paste your bark and you create a layer of fill. I chose one of the layers to reduce the opacity (depending on the project, I try fading each layer to see which effect works best). This gives me a blend and in this case softened out the bark. Then using the shift key (on Mac) select both those layers and "merge layers." I then and did a levels adjustment to add a little contrast to this blend. I wanted some texture so I played with textures and decided that craquelure provided what I wanted. This background layer needed to be larger than the portrait layer, so I used a technique I had learned in December. You take the Clone tool and select an area (in this case I started at the top corner and worked down). After you have made your initial selection, you brush in to fill the area to match the existing texture or pattern. I had always made small corrective touches with the Clone tool. Knowing that you can brush in larger areas makes things so much easier and quicker.
I had already been working on the layers of my face blended into the tree. When I got my final version of that I took those two layers and merged to give me one layer. Now, here is the trick . . . I selected that level and using the option key created a black mask. The black mask makes the layer "disappear." Now I can chose an interesting brush tool and literally brush the layer back in. By choosing one of the irregularly shaped brush tools (with the color set to white) I can carefully work the brush to the edges of the portrait layer leaving a jagged, rough edge. If I make a mistake, all I have to do is set the brush to black, erase, and try again until I have a pattern I like. You can also play with the different shaped brush tools until you find the effect you like.
Now, at the end of the project I wanted to do some finishing touches and making that portrait layer more three dimensional was high on the list. First selected that layer and went to Layer Styles and added a drop shadow. I manipulated all the options until I had the effect I wanted (yes, lots of trial and error - play -it's fun to see how many ways you can add a shadow.) Then I went to bevel and emboss and played there until the bark seemed to stand up off the background.
No comments:
Post a Comment